Sending data to webpanel
Webpanel don’t have any access to your home, so itself cannot extract any data from homekit. You need to send them using automations.
For such process first you need to create collector in webpanel and add automation shortcut in homekit.
Such single POST connection to webpanel from shortcut (request url funtion) I called hit. You can send any amount of data (any number of text fields in FORM) in one hit.
First let’s create collector in webpanel.
- Goto https://webpanel.dziky.pl/ and login (register with email if You don’t have account)
- Open Settings > Collectorts webpange

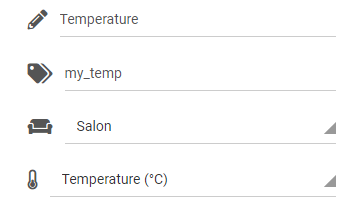
- Add one from predefined for storing temperature sensor
- Slug is unique string to identify collector. We’ll use it in our automation to correct assign send data to this particular collector.
- Name can be anything you like
In our example let’s say slug will be my_temp and Name “Temperature”.
you can organize Your colletors in rooms witch can be added in Settings > rooms section.
So that’s how will look our first collector (push add button to create it)
Collector list:

So now we want to send some data to be stored in database so we can use them to draw chart or log it for future use.
As mention before we need to create homekit shortcut to push data to webpanel.
All automation in homekit need triggers. Automation can be trigger by motion sensor but then our system will send temperature reads only when motion is detected. So at night for example we will not have any hits. We can use homekit timers (they are not aviable in home app, but accessible in third part app like EVE). Problem is that in eve we can’t add shortcuts ☹ but there’s a way to work around.
- Create timer in EVE app in Automatiions > Timers
- Add repeating mode timer and set repeat for 30 minutes
- Start at early as possible (in 5 minutes for example)
- Click next
- On select scene screen create new one called Do nothing and don’t add any actions
- Assign created scene to this timer
- Name this timer for example Send Dziky data every 30 minutes
- And click Done, Your timer will run every 30 minutes but do notking.
- No go to home app and locate this timer in automations (It won’t have any name) using start date time in trigger condition.
- Open it and select add accessories and scene scroll down to convert to shortcut option.
- So now we have shortcut running every 30 minutes.
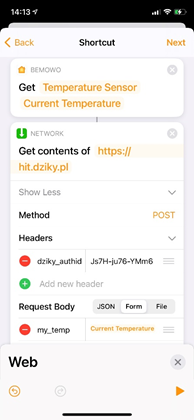
- Now create hit function. For this we use “Get the state of” and “Get contents of” function in homekit shortcut.
- First get current temperature from temperature sensor next create get contents function by filling in the form:
- Method POST
- Add new header:
- Key: dziky_auth_id
- Text: You authID from settings > profile page
- Request body: FORM
- Add new field TEXT:
- Key: (created collector slug): my_temp
- Text: data get from get state function “current temperature”
Automation should look like this:
One thing You need to remember is that any time You edit shortcut in Home App start time in timer will be set for next day (+24h), so each time you update shortcut go to EVE app and set start time to start sending data right away.
In get content function we can send more messurments adding as many TEXT fileds as needed for each “Get state” of homekit accessories. So all will be updates every 30 minutes. You change timer repeat for 10 minute if You need more frequent readings.
Same way You have to send motions detections and other trigered sensors. But not using timer, the automation trigger will be the trigger of the sensor.
First add shrtcut in home App to send get state of all Your sensors, trigered by one of added sensor (it doesn’t matter which one). Again home App will not allow You to set more than one tigger for atomation but in eve app You can set any number of triggers to start automation.
We’re adding shortcut first becouse we can’t change it later! if You update it home app will remove any additional trigers set in eve. So once set up don’t change it. If You need add more sensord just create another automation.
so set all On/Off or any other state change triggers for all accessories You want to send state.
You can use webpanel not only for homekit. It’s just a database witch allow you to stary any kied of data.
For example You can store data using regular CURL command. In this example we will send value 1000 to collector with slug my_co2, Our authID from webpanel profile shoud be insert instead of XXXX
curl -X POST –header “dziky_authId: XXXX-XXXX-XXXX” –data “my_co2=1000” https://hit.dziky.pl
I use CURL to send some data from my servers, CPU and memory utilisation etc.
But you can store anything You like. I have personal Morning shortcut runing after alarm is stoped with calculate “time to work” and store it in webpanel. I can check history log what’s the best time to start going to work each day and i can display curent travel time on livedashboard in my home entry so i know exacly what’s waiting for me on the way:)